Walkthrough example
In this example, we'll learn how to log a scene update for an animated cube to an MCAP file and visualize it live in the Foxglove app using the SDK. You can see the full code example below.
Let's setup a new project called "quickstart". Note the commands here are for Linux and will vary by platform, especially on Windows, if not using WSL.
Create a new project and add the Foxglove SDK
- Rust
- Python
- C++
With cargo installed:
cargo new quickstart --bin
cd quickstart
cargo add foxglove
# Optional to configure debug logs for the SDK
cargo add env_logger
# Optional to handle Ctrl+C interrupts
cargo add ctrlc
With Python 3.10 or newer and uv installed to manage packages.
uv init quickstart
cd quickstart
uv add foxglove-sdk
You'll need cmake and a modern C++ compiler and standard library, we recommend GCC 11 or
newer. Visit the SDK releases
page, find the URL for
your platform and the appropriate version, and replace the url below at the line starting with
URL.
mkdir quickstart
cd quickstart
Create a file CMakeLists.txt:
cmake_minimum_required(VERSION 3.20)
project(quickstart LANGUAGES CXX)

# Set C++ standard
set(CMAKE_CXX_STANDARD 17)
set(CMAKE_CXX_STANDARD_REQUIRED ON)

# Fetch the Foxglove SDK release archive.
include(FetchContent)
FetchContent_Declare(
    foxglove_sdk
    DOWNLOAD_EXTRACT_TIMESTAMP TRUE
    # See available releases and builds here: https://github.com/foxglove/foxglove-sdk/releases?q=sdk%2F&expanded=true
    URL https://github.com/foxglove/foxglove-sdk/releases/download/sdk%2Fv0.24.0/foxglove-v0.24.0-cpp-x86_64-unknown-linux-gnu.zip
    URL_HASH SHA256=4381e1759f08b76f3bb2bf27ac4ab480caeb5cd71b8119221866c469534490c4
)
FetchContent_MakeAvailable(foxglove_sdk)

# Load the SDK's CMake package config (shipped under lib/cmake/foxglove-sdk/).
# It defines IMPORTED targets for the prebuilt C libraries and the
# foxglove_sdk_add_cpp_library() helper used below.
find_package(foxglove-sdk CONFIG REQUIRED HINTS "${foxglove_sdk_SOURCE_DIR}")

# Compile the SDK's C++ wrapper sources against our toolchain.
foxglove_sdk_add_cpp_library(foxglove_cpp TYPE STATIC)

# Add executable
add_executable(quickstart main.cpp)
target_link_libraries(quickstart PRIVATE foxglove_cpp)
Create an MCAP file for writing
The SDK logs to sinks (log destinations). If you do not configure a sink, log messages will simply be dropped without being recorded. You can configure multiple sinks, and you can create or destroy them dynamically at runtime. The SDK comes with two types of sinks:
- An MCAP sink, which directs log output to an MCAP file.
- A WebSocket server which transmits logs over a WebSocket connection to the Foxglove app.
Here's how we can create a sink that writes logs to an MCAP file:
- Rust
- Python
- C++
Open src/main.rs and replace it with:
use foxglove::{McapWriter, WebSocketServer};

const FILE_NAME: &str = "quickstart-rust.mcap";

fn main() {
    // This doesn't affect what gets logged to the MCAP file, this is for troubleshooting the SDK integration
    let env = env_logger::Env::default().default_filter_or("debug");
    env_logger::init_from_env(env);

    // Open an MCAP file for logging
    let mcap = McapWriter::new()
        .create_new_buffered_file(FILE_NAME)
        .expect("Failed to start mcap writer");

    // Calling close is optional; it will be closed when the reference is dropped.
    // Closing it explicitly lets us check for errors.
    mcap.close().expect("error closing mcap writer");
}
Run with:
cargo run
In main.py:
import foxglove

# This doesn't affect what gets logged to the MCAP file, this is for troubleshooting the SDK integration
foxglove.set_log_level("DEBUG")

# Open an MCAP file for logging
file_name = "quickstart-python.mcap"
# Close the mcap writer with close() or the with statement
with foxglove.open_mcap(file_name):
    pass
Run with:
uv run python main.py
Create a file main.cpp
#include <foxglove/foxglove.hpp>
#include <foxglove/context.hpp>
#include <foxglove/error.hpp>
#include <foxglove/mcap.hpp>

#include <iostream>

int main(int argc, const char* argv[]) {
  // This doesn't affect what gets logged to the MCAP file, this is for troubleshooting the SDK integration
  foxglove::setLogLevel(foxglove::LogLevel::Debug);

  foxglove::McapWriterOptions mcap_options = {};
  mcap_options.path = "quickstart-cpp.mcap";
  auto writerResult = foxglove::McapWriter::create(mcap_options);
  if (!writerResult.has_value()) {
    std::cerr << "Failed to create writer: " << foxglove::strerror(writerResult.error()) << '\n';
    return 1;
  }
  auto writer = std::move(writerResult.value());

  return 0;
}
Verify that it compiles:
export CC=gcc
export CXX=g++
# Create the build directory and build with
mkdir build
cd build
cmake ..
cmake --build .
If you see compilation errors from inside the SDK headers, make sure you're using a supported compiler and standard library. We recommend GCC 11 or newer.
Live visualization
We can also add a second log destination, to send them via WebSocket connection to the Foxglove app, for live visualization and debugging. See running the app below for how to connect to it. If there are no connected clients, this adds very little overhead.
- Rust
- Python
- C++
Open src/main.rs and replace it with:
use foxglove::{McapWriter, WebSocketServer};

const FILE_NAME: &str = "quickstart-rust.mcap";

fn main() {
    let env = env_logger::Env::default().default_filter_or("debug");
    env_logger::init_from_env(env);

    // We'll log to both an MCAP file, and to a running Foxglove app via a server.
    let mcap = McapWriter::new()
        .create_new_buffered_file(FILE_NAME)
        .expect("Failed to start mcap writer");

    // Start a server to communicate with the Foxglove app.
    // This will run indefinitely even if references are dropped.
    let server = WebSocketServer::new()
        .start_blocking()
        .expect("Server failed to start");

    // If you need to close it before the process ends, use the stop method.
    // This returns a handle that can be used to gracefully shutdown.
    // Dropping the handle means all client tasks will be immediately aborted.
    server.stop();
}
Open main.py and replace it with:
import foxglove

foxglove.set_log_level("DEBUG")

# We'll log to both an MCAP file, and to a running Foxglove app via a server.
file_name = "quickstart-python.mcap"
# Close the mcap writer with close() or the with statement
with foxglove.open_mcap(file_name):
    server = foxglove.start_server()
Open main.cpp and replace it with:
#include <foxglove/foxglove.hpp>
#include <foxglove/context.hpp>
#include <foxglove/error.hpp>
#include <foxglove/mcap.hpp>
#include <foxglove/server.hpp>

#include <iostream>

int main(int argc, const char* argv[]) {
  foxglove::setLogLevel(foxglove::LogLevel::Debug);

  foxglove::McapWriterOptions mcap_options = {};
  mcap_options.path = "quickstart-cpp.mcap";
  auto writer_result = foxglove::McapWriter::create(mcap_options);
  if (!writer_result.has_value()) {
    std::cerr << "Failed to create writer: " << foxglove::strerror(writer_result.error()) << '\n';
    return 1;
  }
  auto writer = std::move(writer_result.value());

  // Start a server to communicate with the Foxglove app.
  foxglove::WebSocketServerOptions ws_options;
  ws_options.host = "127.0.0.1";
  ws_options.port = 8765;
  auto server_result = foxglove::WebSocketServer::create(std::move(ws_options));
  if (!server_result.has_value()) {
    std::cerr << "Failed to create server: " << foxglove::strerror(server_result.error()) << '\n';
    return 1;
  }
  auto server = std::move(server_result.value());
  std::cerr << "Server listening on port " << server.port() << '\n';

  return 0;
}
Create channels for logging
The SDK logs data via channels. A channel has a topic name and some optional type information. Let's create a channel /size for logging some JSON and another named /scene for logging structured SceneUpdates that we can visualize in the Foxglove app. You can log to channels from any thread, the channels and sinks are thread-safe.
SceneUpdate is one of the Foxglove message types. It updates the entities displayed in a 3D scene. We'll use it to display a 3D animated cube.
- Rust
- Python
- C++
use foxglove::messages::{SceneUpdate};
use foxglove::{LazyChannel, LazyRawChannel, McapWriter, WebSocketServer};

const FILE_NAME: &str = "quickstart-rust.mcap";

// Our example logs data on a couple of different topics, so we'll create a
// channel for each. We can use a channel like Channel<SceneUpdate> to log
// Foxglove message types, or a generic RawChannel to log custom data.
static SCENE: LazyChannel<SceneUpdate> = LazyChannel::new("/scene");
static SIZE: LazyRawChannel = LazyRawChannel::new("/size", "json");

fn main() {
    let env = env_logger::Env::default().default_filter_or("debug");
    env_logger::init_from_env(env);

    // We'll log to both an MCAP file, and to a running Foxglove app via a server.
    // This will be closed when the reference is dropped.
    let mcap = McapWriter::new()
        .create_new_buffered_file(FILE_NAME)
        .expect("Failed to start mcap writer");

    // Start a server to communicate with the Foxglove app.
    // This will run indefinitely even if references are dropped.
    WebSocketServer::new()
        .start_blocking()
        .expect("Server failed to start");
}
import foxglove
from foxglove import Channel
from foxglove.channels import SceneUpdateChannel

foxglove.set_log_level("DEBUG")

# Our example logs data on a couple of different topics, so we'll create a
# channel for each. We can use a channel like SceneUpdateChannel to log
# Foxglove message types, or a generic Channel to log custom data.
scene_channel = SceneUpdateChannel("/scene")
size_channel = Channel("/size", message_encoding="json")

# We'll log to both an MCAP file, and to a running Foxglove app via a server.
file_name = "quickstart-python.mcap"
# Close the mcap writer with close() or the with statement
with foxglove.open_mcap(file_name):
    server = foxglove.start_server()
#include <foxglove/foxglove.hpp>
#include <foxglove/context.hpp>
#include <foxglove/error.hpp>
#include <foxglove/mcap.hpp>
#include <foxglove/server.hpp>
#include <foxglove/channel.hpp>
#include <foxglove/messages.hpp>

#include <iostream>

int main(int argc, const char *argv[])
{
    foxglove::McapWriterOptions mcap_options = {};
    mcap_options.path = "quickstart-cpp.mcap";
    auto writer_result = foxglove::McapWriter::create(mcap_options);
    if (!writer_result.has_value())
    {
        std::cerr << "Failed to create writer: " << foxglove::strerror(writer_result.error()) << '\n';
        return 1;
    }
    auto writer = std::move(writer_result.value());

    // Start a server to communicate with the Foxglove app.
    foxglove::WebSocketServerOptions ws_options;
    ws_options.host = "127.0.0.1";
    ws_options.port = 8765;
    auto server_result = foxglove::WebSocketServer::create(std::move(ws_options));
    if (!server_result.has_value())
    {
        std::cerr << "Failed to create server: " << foxglove::strerror(server_result.error()) << '\n';
        return 1;
    }
    auto server = std::move(server_result.value());
    std::cerr << "Server listening on port " << server.port() << '\n';

    // Create a schema for a JSON channel for logging {size: number}
    foxglove::Schema schema;
    schema.encoding = "jsonschema";
    std::string schema_data = R"({
        "type": "object",
        "properties": {
        "size": { "type": "number" }
        }
    })";
    schema.data = reinterpret_cast<const std::byte *>(schema_data.data());
    schema.data_len = schema_data.size();
    auto channel_result = foxglove::RawChannel::create("/size", "json", std::move(schema));
    if (!channel_result.has_value())
    {
        std::cerr << "Failed to create channel: " << foxglove::strerror(channel_result.error()) << '\n';
        return 1;
    }
    auto size_channel = std::move(channel_result.value());

    // Create a SceneUpdateChannel for logging changes to a 3d scene
    auto scene_channel_result = foxglove::messages::SceneUpdateChannel::create("/scene");
    if (!scene_channel_result.has_value())
    {
        std::cerr << "Failed to create scene channel: " << foxglove::strerror(scene_channel_result.error()) << '\n';
        return 1;
    }
    auto scene_channel = std::move(scene_channel_result.value());

    return 0;
}
Use the channels to log some data
Let's create the SceneUpdate message, and update it at 30 frames a second for 10 seconds (every 33ms).
- Rust
- Python
- C++
use foxglove::messages::{Color, CubePrimitive, SceneEntity, SceneUpdate, Vector3};
use foxglove::{LazyChannel, LazyRawChannel, McapWriter, WebSocketServer};

const FILE_NAME: &str = "quickstart-rust.mcap";

// Our example logs data on a couple of different topics, so we'll create a
// channel for each. We can use a channel like Channel<SceneUpdate> to log
// Foxglove message types, or a generic RawChannel to log custom data.
static SCENE: LazyChannel<SceneUpdate> = LazyChannel::new("/scene");
static SIZE: LazyRawChannel = LazyRawChannel::new("/size", "json");

fn main() {
    let env = env_logger::Env::default().default_filter_or("debug");
    env_logger::init_from_env(env);

    // We'll log to both an MCAP file, and to a running Foxglove app via a server.
    // This will be closed when the reference is dropped.
    let mcap = McapWriter::new()
        .create_new_buffered_file(FILE_NAME)
        .expect("Failed to start mcap writer");

    // Start a server to communicate with the Foxglove app.
    // This will run indefinitely even if references are dropped.
    WebSocketServer::new()
        .start_blocking()
        .expect("Server failed to start");

    for _ in 0..10*30 {
        let size = 1.0 + std::time::SystemTime::now()
            .duration_since(std::time::UNIX_EPOCH)
            .unwrap()
            .as_secs_f64()
            .sin()
            .abs();

        // Log messages on the channel until interrupted. By default, each message
        // is stamped with the current time.
        SIZE.log(format!("{{\"size\": {size}}}").as_bytes());
        SCENE.log(&SceneUpdate {
            deletions: vec![],
            entities: vec![SceneEntity {
                id: "box".to_string(),
                cubes: vec![CubePrimitive {
                    size: Some(Vector3 {
                        x: size,
                        y: size,
                        z: size,
                    }),
                    color: Some(Color {
                        r: 1.0,
                        g: 0.0,
                        b: 0.0,
                        a: 1.0,
                    }),
                    ..Default::default()
                }],
                ..Default::default()
            }],
        });

        std::thread::sleep(std::time::Duration::from_millis(33));
    }
}
import math
import time

import foxglove
from foxglove import Channel
from foxglove.channels import SceneUpdateChannel
from foxglove.messages import (
    Color,
    CubePrimitive,
    SceneEntity,
    SceneUpdate,
    Vector3,
)

foxglove.set_log_level("DEBUG")

# Our example logs data on a couple of different topics, so we'll create a
# channel for each. We can use a channel like SceneUpdateChannel to log
# Foxglove message types, or a generic Channel to log custom data.
scene_channel = SceneUpdateChannel("/scene")
size_channel = Channel("/size", message_encoding="json")

# We'll log to both an MCAP file, and to a running Foxglove app via a server.
file_name = "quickstart-python.mcap"
# Close the mcap writer with close() or the with statement
with foxglove.open_mcap(file_name):
    server = foxglove.start_server()

    for _ in range(10*30):
        size = abs(math.sin(time.time())) + 1

        # Log messages on both channels until interrupted. By default, each message
        # is stamped with the current time.
        size_channel.log({"size": size})
        scene_channel.log(
            SceneUpdate(
                entities=[
                    SceneEntity(
                        cubes=[
                            CubePrimitive(
                                size=Vector3(x=size, y=size, z=size),
                                color=Color(r=1.0, g=0, b=0, a=1.0),
                            )
                        ],
                    ),
                ]
            )
        )

        time.sleep(0.033)
#include <foxglove/foxglove.hpp>
#include <foxglove/context.hpp>
#include <foxglove/error.hpp>
#include <foxglove/mcap.hpp>
#include <foxglove/server.hpp>
#include <foxglove/channel.hpp>
#include <foxglove/messages.hpp>

#include <chrono>
#include <cmath>
#include <thread>
#include <iostream>

using namespace std::chrono_literals;

int main(int argc, const char *argv[])
{
    foxglove::setLogLevel(foxglove::LogLevel::Debug);

    foxglove::McapWriterOptions mcap_options = {};
    mcap_options.path = "quickstart-cpp.mcap";
    auto writer_result = foxglove::McapWriter::create(mcap_options);
    if (!writer_result.has_value())
    {
        std::cerr << "Failed to create writer: " << foxglove::strerror(writer_result.error()) << '\n';
        return 1;
    }
    auto writer = std::move(writer_result.value());

    // Start a server to communicate with the Foxglove app.
    foxglove::WebSocketServerOptions ws_options;
    ws_options.host = "127.0.0.1";
    ws_options.port = 8765;
    auto server_result = foxglove::WebSocketServer::create(std::move(ws_options));
    if (!server_result.has_value())
    {
        std::cerr << "Failed to create server: " << foxglove::strerror(server_result.error()) << '\n';
        return 1;
    }
    auto server = std::move(server_result.value());
    std::cerr << "Server listening on port " << server.port() << '\n';

    // Create a schema for a JSON channel for logging {size: number}
    foxglove::Schema schema;
    schema.encoding = "jsonschema";
    std::string schema_data = R"({
        "type": "object",
        "properties": {
        "size": { "type": "number" }
        }
    })";
    schema.data = reinterpret_cast<const std::byte *>(schema_data.data());
    schema.data_len = schema_data.size();
    auto channel_result = foxglove::RawChannel::create("/size", "json", std::move(schema));
    if (!channel_result.has_value())
    {
        std::cerr << "Failed to create channel: " << foxglove::strerror(channel_result.error()) << '\n';
        return 1;
    }
    auto size_channel = std::move(channel_result.value());

    // Create a SceneUpdateChannel for logging changes to a 3d scene
    auto scene_channel_result = foxglove::messages::SceneUpdateChannel::create("/scene");
    if (!scene_channel_result.has_value())
    {
        std::cerr << "Failed to create scene channel: " << foxglove::strerror(scene_channel_result.error()) << '\n';
        return 1;
    }
    auto scene_channel = std::move(scene_channel_result.value());

    for (int i = 0; i < 10 * 30; i++)
    {
        auto sec_since_epoch = std::chrono::duration_cast<std::chrono::duration<double>>(
            std::chrono::system_clock::now().time_since_epoch()).count();
        double size = abs(sin(sec_since_epoch)) + 1.0;
        std::string msg = "{\"size\": " + std::to_string(size) + "}";
        size_channel.log(reinterpret_cast<const std::byte *>(msg.data()), msg.size());

        foxglove::messages::CubePrimitive cube;
        cube.size = foxglove::messages::Vector3{size, size, size};
        cube.color = foxglove::messages::Color{1, 0, 0, 1};

        foxglove::messages::SceneEntity entity;
        entity.id = "box";
        entity.cubes.push_back(cube);

        foxglove::messages::SceneUpdate scene_update;
        scene_update.entities.push_back(entity);

        scene_channel.log(scene_update);

        std::this_thread::sleep_for(33ms);
    }

    return 0;
}
You can now open the generated .mcap file with the Foxglove app. To quickly inspect the data you've logged to the MCAP file, you can also use the MCAP CLI.
mcap info <file.mcap>
Some context
You may have wondered how the data gets logged from the channels above to the sinks we setup at the start of main. The answer is they're linked together by a Context object that acts like a kind of a namespace/container for sinks and channels. All channels in a context are logged to all sinks for that same context. A channel and a sink can only be associated with a single context. In the example above, we don't specify the context, so the same global default context is used for everything, which is how they ended up connected.
We could have made the context explicit like this:
- Rust
- Python
- C++
use foxglove::messages::{Color, CubePrimitive, SceneEntity, SceneUpdate, Vector3};
use foxglove::{LazyContext, LazyChannel, LazyRawChannel, McapWriter, WebSocketServer};

const FILE_NAME: &str = "quickstart-rust.mcap";

static CTX_A: LazyContext = LazyContext::new();

// Our example logs data on a couple of different topics, so we'll create a
// channel for each. We can use a channel like Channel<SceneUpdate> to log
// Foxglove message types, or a generic RawChannel to log custom data.
static SCENE: LazyChannel<SceneUpdate> = CTX_A.channel("/scene");
static SIZE: LazyRawChannel = CTX_A.raw_channel("/size", "json");

fn main() {
    let env = env_logger::Env::default().default_filter_or("debug");
    env_logger::init_from_env(env);

    // We'll log to both an MCAP file, and to a running Foxglove app via a server.
    // This will be closed when the reference is dropped.
    let mcap = CTX_A.mcap_writer()
        .create_new_buffered_file(FILE_NAME)
        .expect("Failed to start mcap writer");

    // Start a server to communicate with the Foxglove app.
    // This will run indefinitely even if references are dropped.
    CTX_A.websocket_server()
        .start_blocking()
        .expect("Server failed to start");
}
import math
import time

import foxglove
from foxglove import Channel, Context
from foxglove.channels import SceneUpdateChannel
from foxglove.messages import (
    Color,
    CubePrimitive,
    SceneEntity,
    SceneUpdate,
    Vector3,
)

foxglove.set_log_level("DEBUG")

ctx_a = Context()

# Our example logs data on a couple of different topics, so we'll create a
# channel for each. We can use a channel like SceneUpdateChannel to log
# Foxglove message types, or a generic Channel to log custom data.
scene_channel = SceneUpdateChannel("/scene", context=ctx_a)
size_channel = Channel("/size", message_encoding="json", context=ctx_a)

# We'll log to both an MCAP file, and to a running Foxglove app via a server.
file_name = "quickstart-python.mcap"
# Close the mcap writer with close() or the with statement
with foxglove.open_mcap(file_name, context=ctx_a):
    server = foxglove.start_server(context=ctx_a)

    for _ in range(10*30):
        size = abs(math.sin(time.time())) + 1

        # Log messages on both channels until interrupted. By default, each message
        # is stamped with the current time.
        size_channel.log({"size": size})
        scene_channel.log(
            SceneUpdate(
                entities=[
                    SceneEntity(
                        cubes=[
                            CubePrimitive(
                                size=Vector3(x=size, y=size, z=size),
                                color=Color(r=1.0, g=0, b=0, a=1.0),
                            )
                        ],
                    ),
                ]
            )
        )

        time.sleep(0.033)
#include <foxglove/foxglove.hpp>
#include <foxglove/context.hpp>
#include <foxglove/error.hpp>
#include <foxglove/mcap.hpp>
#include <foxglove/server.hpp>
#include <foxglove/channel.hpp>
#include <foxglove/messages.hpp>

#include <chrono>
#include <thread>
#include <iostream>

using namespace std::chrono_literals;

int main(int argc, const char *argv[])
{
    foxglove::setLogLevel(foxglove::LogLevel::Debug);

    foxglove::Context context;

    foxglove::McapWriterOptions mcap_options = {};
    mcap_options.path = "quickstart-cpp.mcap";
    mcap_options.context = context;
    auto writer_result = foxglove::McapWriter::create(mcap_options);
    if (!writer_result.has_value())
    {
        std::cerr << "Failed to create writer: " << foxglove::strerror(writer_result.error()) << '\n';
        return 1;
    }
    auto writer = std::move(writer_result.value());

    // Start a server to communicate with the Foxglove app.
    foxglove::WebSocketServerOptions ws_options;
    ws_options.host = "127.0.0.1";
    ws_options.port = 8765;
    ws_options.context = context;
    auto server_result = foxglove::WebSocketServer::create(std::move(ws_options));
    if (!server_result.has_value())
    {
        std::cerr << "Failed to create server: " << foxglove::strerror(server_result.error()) << '\n';
        return 1;
    }
    auto server = std::move(server_result.value());
    std::cerr << "Server listening on port " << server.port() << '\n';

    // Create a schema for a JSON channel for logging {size: number}
    foxglove::Schema schema;
    schema.encoding = "jsonschema";
    std::string schema_data = R"({
        "type": "object",
        "properties": {
        "size": { "type": "number" }
        }
    })";
    schema.data = reinterpret_cast<const std::byte *>(schema_data.data());
    schema.data_len = schema_data.size();
    auto channel_result = foxglove::RawChannel::create("/size", "json", std::move(schema), context);
    if (!channel_result.has_value())
    {
        std::cerr << "Failed to create channel: " << foxglove::strerror(channel_result.error()) << '\n';
        return 1;
    }
    auto size_channel = std::move(channel_result.value());

    // Create a SceneUpdateChannel for logging changes to a 3d scene
    auto scene_channel_result = foxglove::messages::SceneUpdateChannel::create("/scene", context);
    if (!scene_channel_result.has_value())
    {
        std::cerr << "Failed to create scene channel: " << foxglove::strerror(scene_channel_result.error()) << '\n';
        return 1;
    }
    auto scene_channel = std::move(scene_channel_result.value());

    return 0;
}
Example code
Here's the full example. We've modified the loop to continue until explicit exit via Ctrl+C interrupt.
- Rust
- Python
- C++
use std::ops::Add;
use std::sync::atomic::{AtomicBool, Ordering};
use std::sync::Arc;
use std::time::SystemTime;

use foxglove::messages::{Color, CubePrimitive, SceneEntity, SceneUpdate, Vector3};
use foxglove::{LazyChannel, LazyRawChannel, McapWriter};

const FILE_NAME: &str = "quickstart-rust.mcap";

// Our example logs data on a couple of different topics, so we'll create a
// channel for each. We can use a channel like Channel<SceneUpdate> to log
// Foxglove message types, or a generic RawChannel to log custom data.
static SCENE: LazyChannel<SceneUpdate> = LazyChannel::new("/scene");
static SIZE: LazyRawChannel = LazyRawChannel::new("/size", "json");

fn main() {
    let env = env_logger::Env::default().default_filter_or("debug");
    env_logger::init_from_env(env);

    let done = Arc::new(AtomicBool::default());
    ctrlc::set_handler({
        let done = done.clone();
        move || {
            done.store(true, Ordering::Relaxed);
        }
    })
    .expect("Failed to set SIGINT handler");

    // We'll log to both an MCAP file, and to a running Foxglove app via a server.
    let mcap = McapWriter::new()
        .create_new_buffered_file(FILE_NAME)
        .expect("Failed to start mcap writer");

    // Start a server to communicate with the Foxglove app. This will run indefinitely, even if
    // references are dropped.
    foxglove::WebSocketServer::new()
        .start_blocking()
        .expect("Server failed to start");

    while !done.load(Ordering::Relaxed) {
        let size = SystemTime::now()
            .duration_since(std::time::UNIX_EPOCH)
            .unwrap()
            .as_secs_f64()
            .sin()
            .abs()
            .add(1.0);

        // Log messages on the channel until interrupted. By default, each message
        // is stamped with the current time.
        SIZE.log(format!("{{\"size\": {size}}}").as_bytes());
        SCENE.log(&SceneUpdate {
            deletions: vec![],
            entities: vec![SceneEntity {
                id: "box".to_string(),
                cubes: vec![CubePrimitive {
                    size: Some(Vector3 {
                        x: size,
                        y: size,
                        z: size,
                    }),
                    color: Some(Color {
                        r: 1.0,
                        g: 0.0,
                        b: 0.0,
                        a: 1.0,
                    }),
                    ..Default::default()
                }],
                ..Default::default()
            }],
        });

        std::thread::sleep(std::time::Duration::from_millis(33));
    }

    mcap.close().expect("Failed to close mcap writer");
}
For more examples, see the source examples and reference documentation.
import math
import time

import foxglove
from foxglove import Channel
from foxglove.channels import SceneUpdateChannel
from foxglove.messages import (
    Color,
    CubePrimitive,
    SceneEntity,
    SceneUpdate,
    Vector3,
)

foxglove.set_log_level("DEBUG")

# Our example logs data on a couple of different topics, so we'll create a
# channel for each. We can use a channel like SceneUpdateChannel to log
# Foxglove message types, or a generic Channel to log custom data.
scene_channel = SceneUpdateChannel("/scene")
size_channel = Channel("/size", message_encoding="json")

# We'll log to both an MCAP file, and to a running Foxglove app via a server.
file_name = "quickstart-python.mcap"
# Close the mcap writer with close() or the with statement
with foxglove.open_mcap(file_name):
    server = foxglove.start_server()
    while True:
        size = abs(math.sin(time.time())) + 1

        # Log messages on both channels until interrupted. By default, each message
        # is stamped with the current time.
        size_channel.log({"size": size})
        scene_channel.log(
            SceneUpdate(
                entities=[
                    SceneEntity(
                        cubes=[
                            CubePrimitive(
                                size=Vector3(x=size, y=size, z=size),
                                color=Color(r=1.0, g=0, b=0, a=1.0),
                            )
                        ],
                    ),
                ]
            )
        )

        time.sleep(0.033)
For more examples, see the source examples or examples in documentation.
#include <foxglove/foxglove.hpp>
#include <foxglove/context.hpp>
#include <foxglove/error.hpp>
#include <foxglove/mcap.hpp>
#include <foxglove/server.hpp>
#include <foxglove/channel.hpp>
#include <foxglove/messages.hpp>

#include <atomic>
#include <chrono>
#include <cmath>
#include <thread>
#include <iostream>
#include <csignal>
#include <functional>

using namespace std::chrono_literals;

int main(int argc, const char *argv[])
{
  foxglove::setLogLevel(foxglove::LogLevel::Debug);

  static std::function<void()> sigint_handler;

  std::signal(SIGINT, [](int) {
    if (sigint_handler) {
      sigint_handler();
    }
  });

  foxglove::McapWriterOptions mcap_options = {};
  mcap_options.path = "quickstart-cpp.mcap";
  auto writer_result = foxglove::McapWriter::create(mcap_options);
  if (!writer_result.has_value())
  {
    std::cerr << "Failed to create writer: " << foxglove::strerror(writer_result.error()) << '\n';
    return 1;
  }
  auto writer = std::move(writer_result.value());

  // Start a server to communicate with the Foxglove app.
  foxglove::WebSocketServerOptions ws_options;
  ws_options.host = "127.0.0.1";
  ws_options.port = 8765;
  auto server_result = foxglove::WebSocketServer::create(std::move(ws_options));
  if (!server_result.has_value())
  {
    std::cerr << "Failed to create server: " << foxglove::strerror(server_result.error()) << '\n';
    return 1;
  }
  auto server = std::move(server_result.value());
  std::cerr << "Server listening on port " << server.port() << '\n';

  // Create a schema for a JSON channel for logging {size: number}
  foxglove::Schema schema;
  schema.encoding = "jsonschema";
  std::string schema_data = R"({
        "type": "object",
        "properties": {
        "size": { "type": "number" }
        }
    })";
  schema.data = reinterpret_cast<const std::byte *>(schema_data.data());
  schema.data_len = schema_data.size();
  auto channel_result = foxglove::RawChannel::create("/size", "json", std::move(schema));
  if (!channel_result.has_value())
  {
    std::cerr << "Failed to create channel: " << foxglove::strerror(channel_result.error()) << '\n';
    return 1;
  }
  auto size_channel = std::move(channel_result.value());

  // Create a SceneUpdateChannel for logging changes to a 3d scene
  auto scene_channel_result = foxglove::messages::SceneUpdateChannel::create("/scene");
  if (!scene_channel_result.has_value())
  {
    std::cerr << "Failed to create scene channel: " << foxglove::strerror(scene_channel_result.error()) << '\n';
    return 1;
  }
  auto scene_channel = std::move(scene_channel_result.value());

  std::atomic_bool done = false;
  sigint_handler = [&]
  {
    done = true;
  };

  while (!done)
  {
    auto sec_since_epoch = std::chrono::duration_cast<std::chrono::duration<double>>(
        std::chrono::system_clock::now().time_since_epoch()).count();
    double size = abs(sin(sec_since_epoch)) + 1.0;
    std::string msg = "{\"size\": " + std::to_string(size) + "}";
    size_channel.log(reinterpret_cast<const std::byte *>(msg.data()), msg.size());

    foxglove::messages::CubePrimitive cube;
    cube.size = foxglove::messages::Vector3{size, size, size};
    cube.color = foxglove::messages::Color{1, 0, 0, 1};

    foxglove::messages::SceneEntity entity;
    entity.id = "box";
    entity.cubes.push_back(cube);

    foxglove::messages::SceneUpdate scene_update;
    scene_update.entities.push_back(entity);

    scene_channel.log(scene_update);

    std::this_thread::sleep_for(33ms);
  }

  return 0;
}
For more examples, see the source examples.
Running the app
Now that you're running the above example, let's view the live visualization.
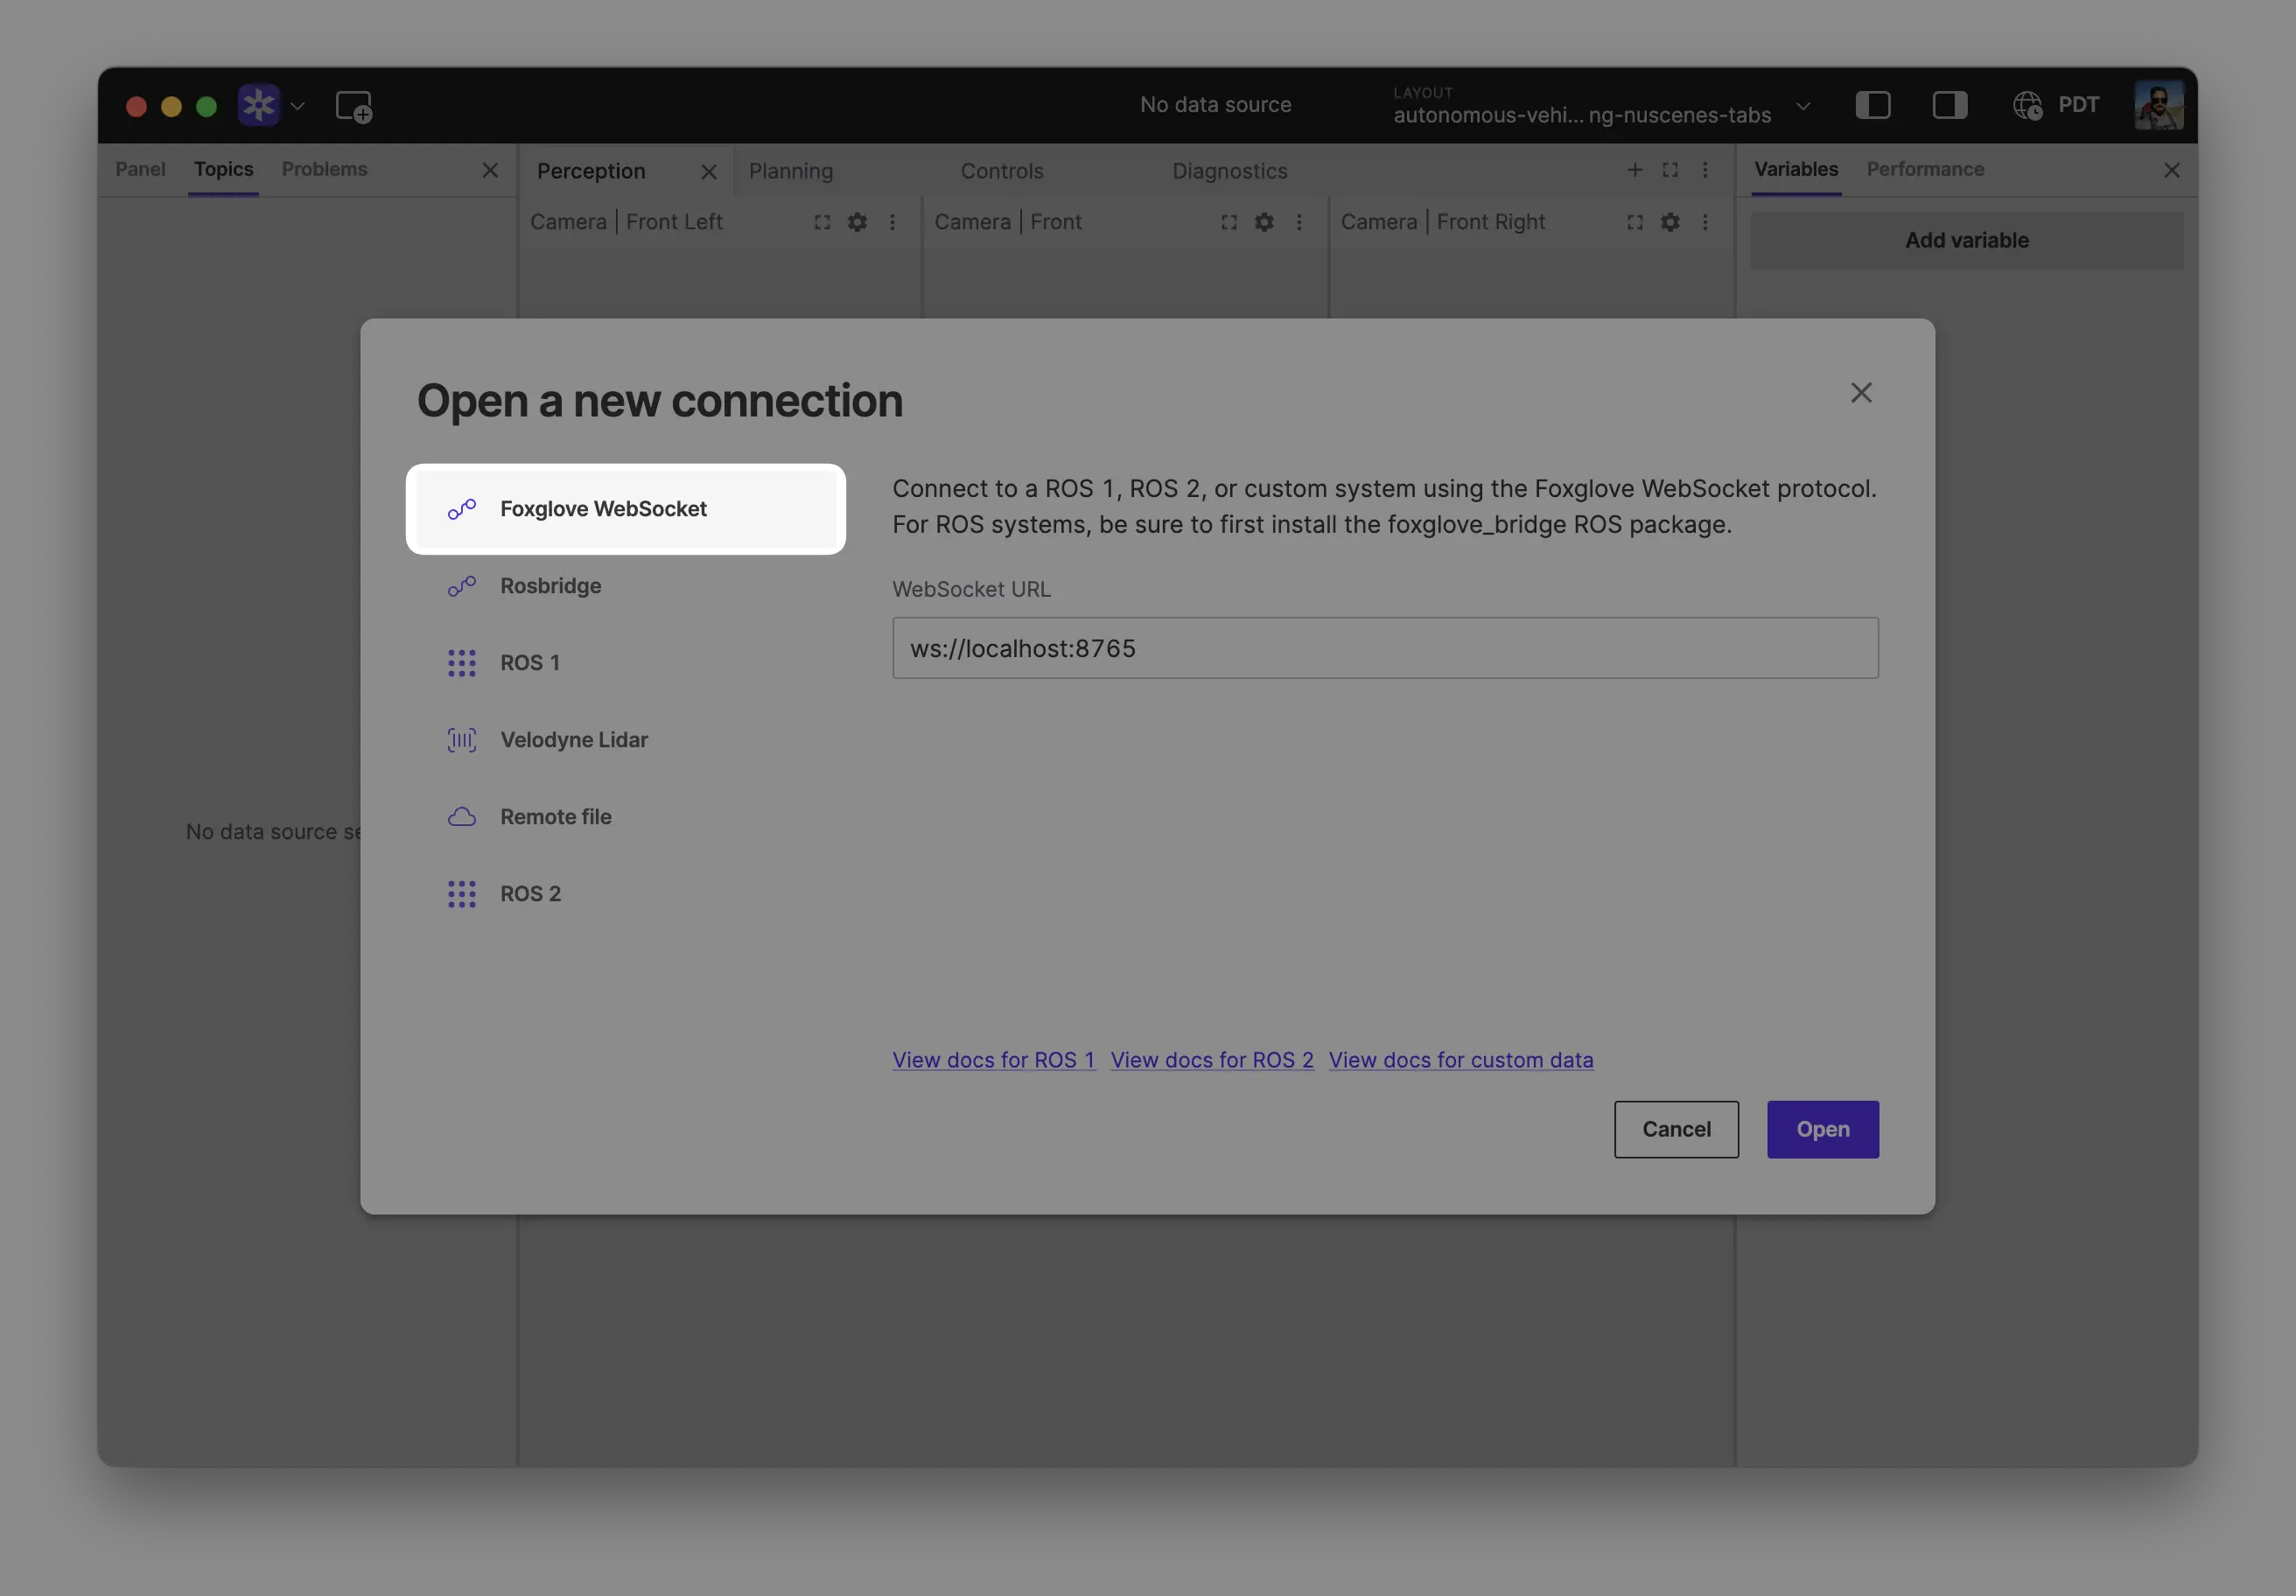
- Open the Foxglove app or visit https://app.foxglove.dev/.
- Click "Open connection..." and open a Foxglove WebSocket connection with the default URL.
- Add a 3D panel to your layout.
- Subscribe to the "/scene" topic by toggling its visibility in the panel settings sidebar.
See the Live data documentation for help connecting to the app, and the 3D panel documentation for help configuring the scene.