Getting started guide
The Foxglove wizard is a command line tool that streams a sample drone recording live into Foxglove, uploads that same recording to your project, and tags the moment the drone takes off so you can search for it. One command covers all three, so you can see how Foxglove works before you connect a robot or write any code.
The app walks you through these same steps on its Getting started page, which opens automatically the first time you open Foxglove. To open it again later, use the command palette (Cmd/Ctrl + K) and search for "Getting started".
Before you start
- Create a free Foxglove account
- Download the desktop app or use app.foxglove.dev in Chrome
- Install uv, or use Python 3.9 or newer with
pip
Run the wizard
The wizard uploads its recording to a Foxglove project, so it needs a project ID. The Getting started page fills yours in for you and offers the same package manager choice, which makes copying the command from there the shortest path. To write the command yourself, replace <project-id> with the project you want the recording to land in.
- uv
- pip
uv runs the wizard without a separate install step:
uvx foxglove-wizard --project-id <project-id>
Create and activate a virtual environment, install the wizard, then run it.
On macOS or Linux:
python3 -m venv .venv
source .venv/bin/activate
pip install foxglove-wizard
foxglove-wizard --project-id <project-id>
On Windows:
python -m venv .venv
.venv\Scripts\activate
pip install foxglove-wizard
foxglove-wizard --project-id <project-id>
The wizard opens your browser so you can sign in and confirm the request. If the browser doesn't open, use the verification link and code it prints in your terminal. It signs you in for that session only — it creates no API key and writes no credentials to disk.
Once you confirm, the wizard serves the recording at ws://localhost:8765 and waits for Foxglove to connect. Leave it running.
Running the wizard is the only step in your terminal — from here you work in Foxglove. You'll connect to the stream you just started, watch the drone fly live in the viewer, then search the recording the wizard saved.
See it live
Once connected, Foxglove opens the viewer, its visualization workspace, on a prebuilt layout built for the drone's flight. The wizard replays the recording at the cadence it was captured, so the data updates in real time rather than arriving all at once. A You're live in Foxglove hint confirms the stream — leave the wizard running to keep the data flowing.
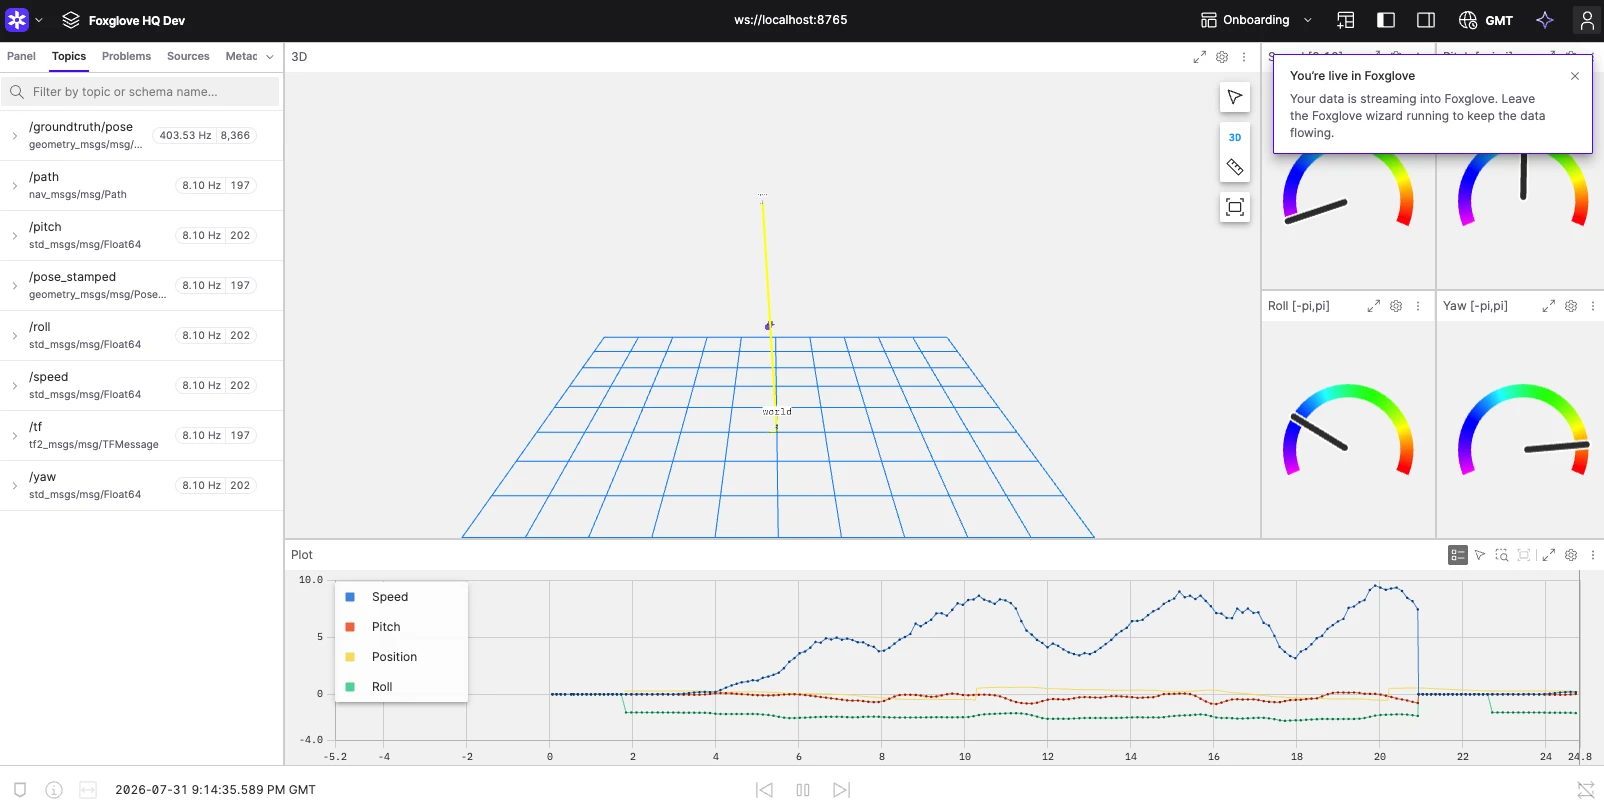
The layout arranges several panels, each showing the same flight a different way:
- A 3D panel plots the drone in space over the
worldgrid, tracing its pose and flight path as the recording plays. - Four Gauge panels read the drone's live telemetry: Speed (0 to 10) and its orientation as Pitch, Roll, and Yaw (each −π to π radians). Every needle tracks the current value as the recording plays.
- A Plot panel traces those values over time — speed, pitch, roll, and position — so you can see how the flight develops, not just where the drone is right now.
Together they show one recording from several angles at once, which is the point of a layout. The viewer is where you'll spend most of your time in Foxglove — drag the panels around, add your own, or save the arrangement as a layout you can reuse.
Search the uploaded recording
While it streams, the wizard also uploads the same recording to your project and tags an event three seconds in, where the drone takes off — so the flight is saved and searchable, not just shown once. When the Your recording has been uploaded hint appears in the viewer:
-
Select Search your data.
-
Foxglove opens the Search page with the takeoff query already filled in and run:
event.properties.event like takeoff -
You land on the matching event, and an Explore your data hint points out the takeoff events the wizard recorded.
Edit the query to explore the rest of the flight, or open a result to play the recording back without the live connection.
Recap
The wizard exercised every core Foxglove concept. It streamed messages on topics through channels, which Foxglove rendered in panels arranged into a layout you can rearrange, save, and share. The same messages were recorded to an MCAP file and uploaded as a searchable recording carrying an event. Everything else you do in Foxglove builds on those pieces.
Troubleshooting
If Foxglove doesn't connect:
- Confirm the wizard is still running in your terminal
- Check the connection URL is
ws://localhost:8765 - If the wizard runs on another machine, use that machine's IP address instead of
localhost
If sign-in doesn't finish, open the verification link the wizard printed in your terminal and enter the code shown beside it.
If a Still waiting for your recording hint appears, the upload hasn't registered yet. Leave the wizard running until it reports the upload finished, then reload the page.
Next steps
- Add more panels — try a Plot or Raw Messages panel, then save your arrangement as a layout
- Log from your own code or robot — add the SDK to your Python, C++, or Rust program, or connect ROS, PX4, or LeRobot
- Upload your own recordings so your team can search and share them
- Learn the SDK concepts behind channels, schemas, and servers